Ran out of gift bows at the last minute? A beautifully wrapped gift can feel incomplete without one. Use your leftover wrapping paper to create a perfect, custom bow.
To make a bow from wrapping paper, cut several strips of paper. Twist each strip to form a figure-eight loop. Layer these loops on top of each other in a starburst pattern, from largest to smallest. Secure the layers together in the center with tape or glue.

You now know the basic method. But the difference between an amateur bow and a professional one is in the details. As someone who has managed the production of millions of gift boxes, I’ve learned that small touches make a huge impact. Let’s walk through the process together, so you can create bows that look like they came from a high-end boutique. It’s easier than you think.
What Are the Essential Steps for a Perfect Paper Bow?
Your handmade bows always look a bit floppy or uneven. This can spoil the look of an otherwise perfectly wrapped gift. Follow my detailed factory-floor steps for a crisp, professional finish every time.
First, gather quality wrapping paper, sharp scissors, and double-sided tape or a glue gun. Cut nine strips of paper. Form eight strips into loops and stack them to create the bow. Use the ninth, smaller strip to hide the center mechanics.

In my years running Yiwu Omet Packaging, I’ve seen how precision turns simple materials into luxury experiences. Making a great bow is no different. It’s a small-scale manufacturing process. You need the right materials, clear measurements, and a solid assembly technique. Let’s break it down into simple, repeatable steps.
Step 1: Prepare Your Materials
The quality of your bow starts with the quality of your paper. Flimsy paper will tear and won’t hold its shape. You need something with a bit of body. I recommend paper that is at least 80 GSM1 (grams per square meter). For our premium gift and apparel boxes, we often use 120 GSM paper to ensure a quality feel. Also, consider using double-sided tape2 instead of regular tape. It creates a seamless look, which is crucial for the high-end cosmetic and jewelry brands we work with. A glue gun also works well for a stronger bond.
Step 2: Cut the Strips with Precision
Consistency is key. Use a ruler to ensure your strips are all the same width, typically around 1 inch (or 2.5 cm). The length is what creates the bow’s layers. For a standard-sized bow, here is a cutting guide1 my team uses.
| Strip Quantity | Length (inches) | Length (cm) | Purpose |
|---|---|---|---|
| 3 strips | 11 inches | ~28 cm | Base Layer |
| 3 strips | 10 inches | ~25.5 cm | Middle Layer |
| 2 strips | 9 inches | ~23 cm | Top Layer |
| 1 strip | 4 inches | ~10 cm | Center Circle |
Step 3: Assemble with Care
Take one of the longest strips. Twist it into a figure-eight shape1, bringing both ends to the center, and secure them with a piece of double-sided tape. Don’t fold or crease the loops; you want them to be puffy. Repeat this for all eight of the longer strips. Now, start assembling. Stack the three longest loops on top of each other in a starburst pattern2. Then, stack the three medium loops on top of those, filling in the gaps. Finally, add the two shortest loops on top. Take the smallest 4-inch strip, form it into a simple circle, and tape it in the center of the bow. This hides all the tape and gives your bow a clean, finished look.
How Do You Choose the Right Wrapping Paper for Your Bow?
Your bow keeps tearing or looks weak and flimsy. Using the wrong paper can make your efforts feel wasted, resulting in a sad-looking bow. Choosing the correct paper is the first and most important step for a sturdy bow.
Select a paper that is thick and durable. Look for a weight of at least 80 GSM. Double-sided wrapping paper is excellent for a unique, two-tone effect. For a more luxurious feel, choose papers with a foil, gloss, or satin finish that complements your gift box.

I learned early in my career that the material is the message. When we produce packaging for global brands, the paper choice is a major decision. It communicates value before the box is even opened. The same principle applies to your handmade bow. The paper’s weight, texture, and finish all contribute to the final impression. A well-chosen paper not only makes the process easier but also elevates the entire gift.
Understanding Paper Weight (GSM)
GSM stands for Grams per Square Meter. It’s a direct measure of a paper’s density and thickness. Most cheap, standard wrapping paper is around 60 [GSM], which tears easily and is difficult to shape. For a bow that needs to hold its form, you should look for something heavier.
- 80-100 GSM: This is a great all-purpose weight. It’s sturdy enough to create crisp loops without being too difficult to fold and twist. Many premium gift wraps fall into this range.
- 110-140 GSM: This is what we use at Omet Packaging for luxury gift boxes and shopping bags. It’s very durable and gives the bow a substantial, high-quality feel. It’s perfect for larger bows on significant gifts.
Considering Finish and Type
The paper’s finish drastically changes the bow’s character.
- Kraft Paper1: This gives a rustic, organic, and eco-friendly look. It’s very strong and easy to work with. We often recommend it to clients with a natural or sustainable brand ethos, especially since our FSC certification guarantees the paper comes from responsible sources.
- Coated Art Paper2: This paper has a smooth, slightly glossy surface that makes colors pop. It’s the standard for high-quality gift wrap and is perfect for creating vibrant, cheerful bows for food or electronics packaging.
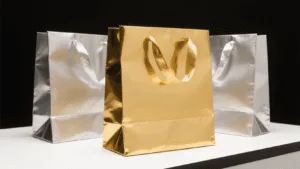
- Foil or Metallic Paper: This adds instant luxury and glamour. It’s perfect for jewelry, cosmetics, or special occasion gifts. It can be a bit stiffer, but the stunning result is worth the extra effort.
Are There Advanced Techniques to Elevate Your Paper Bows?
Your standard paper bow looks nice, but a bit plain. You want your gift to make a real statement and show extra thought. Learning a few professional tricks can transform your simple bow into a memorable work of art.
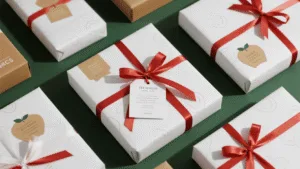
Combine different papers for a multi-layered look. Use a solid color with a patterned paper for contrast. Add unique embellishments like a small brand tag or a natural element. Finally, cut the gift tag’s ribbon ends into a V-notch for a polished finish.

In the packaging business, differentiation is everything. We are always looking for ways to help our clients’ products stand out on the shelf. These advanced techniques come directly from that mindset. They are simple additions that add a layer of sophistication and personality. I remember a project for a boutique client where we added a tiny, laser-engraved wooden charm to their packaging ribbon. It was a tiny detail, but customers loved it. It made the unboxing experience special.
Technique 1: Layering Different Papers
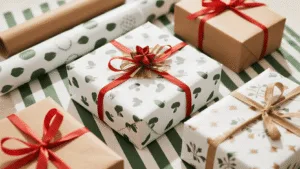
Don’t limit yourself to just one type of wrapping paper1. Creating a bow with two contrasting papers adds depth and visual interest. A great combination is a solid-colored paper2 for the bottom layers and a patterned paper for the top layers. For example, for a Christmas gift, you could use a solid red for the base and a green-and-white striped paper for the accents. This technique allows for endless creativity and lets you perfectly match the bow to any gift box or occasion. It’s a simple way to make the bow look more complex and thoughtfully designed.
Technique 2: Adding Thoughtful Embellishments
The center of the bow is the perfect place for a personal touch. Instead of just a simple paper loop, you can add something extra.
- Natural Elements1: A small sprig of dried lavender, a tiny pinecone, or a sprig of fresh rosemary can add a beautiful, fragrant touch, especially for gifts like food or cosmetics.
- Charms or Buttons2: A vintage button or a small charm can add a bit of personality. For our e-commerce clients, we’ve even suggested tiny branded metal tags to reinforce their brand identity.
- Glitter: A light dusting of craft glitter on the edges of the loops can add a touch of sparkle for a festive occasion.
Technique 3: Professional Finishing Touches
This technique applies to the ribbon tails you might add separately. Instead of leaving the ends straight, give them a professional cut. The "V-notch1" or "fishtail" cut is the most popular. To do this, fold the end of the ribbon in half lengthwise and cut upwards at a 45-degree angle from the fold. This small detail instantly makes the entire presentation look cleaner and more high-end. It signals a level of care and quality that people notice, which is something we strive for in our BSCI-certified factory every day.
Conclusion
Making a beautiful bow from leftover wrapping paper is a simple, sustainable, and smart skill. You can now craft professional-looking bows that add a personal, high-end touch to any gift.